Tuesday, January 22, 2013

Dreaming and Planning

So this weekend, I worked very hard on our basement.  It, thankfully, is going to require much of my physical and mental energy through the winter.  When I finally get the Carpe Diem, I should be able to spend my time working on her.  One thing I've learned from the basement project is that no matter what you 'think' you can do, it will take twice as long to do it 'right.'   You might as well embrace that and find joy in the process. 

I didn't have a lot of time to dream about her, but I did find a few things that I thought were pretty exciting.  I found a couple of images of a completely restored 1947 Tourette.   Whoever owned this must have stripped it down to the bare bones and re-skinned the whole thing.  It was a random post on Pintrest that mentioned a hot rod 'hotel' they saw at a car show.


As you can see, the aluminum is perfect, as is the galley.  I wonder if that fridge is still an ice box or if they up-cycled it and made it a real fridge?  It is gorgeous nonetheless.  I also like how they have put a solar panel on top.  I want to add a solar panel to my rig eventually so that it can charge up the battery when we are off the grid.  I like that this system seems to be able to be put up on demand and is not permanently anchored to the roof. I don't know anything about solar power, so I am looking forward to researching it.  Harbor Freight has a 45 watt solar panel for less than $200 that includes a converter for 12 v and other voltages.  It seems like a decent deal.  Again, something to research.

While I don't like the specific 'pin up' found on the side of the Teardrop, the side of the trailer does provide a nice canvas to express yourself.  I'm not sure exactly what I might put on there, but it's fun to imagine.  For sure, as I said in the last post, I'll put the name CARPE DIEM, on her somewhere.  Right now I'm leaning toward the hatch.


Friday, January 18, 2013

And we shall name her, Carpe Diem!

Anyone who knows me knows that Carpe Diem is my 'catch phrase.'  It literally means, for those of you who never saw the movie Dead Poet's Society, "Seize the day."

Every since I saw that film in the summer of 1989, two things were certain:
  1. I was going to be an educator
  2. I was going to make my life extraordinary
I cut out and laminated an ad for the film and placed it on my lesson plan book.  I looked at it every single day for nearly a decade.  Now the phrase is in huge letters in my office.  It greets me every morning and night when I enter or leave my garage.  Soon it will be on the back of my Teardrop!

The idea, which is literally translated as "Pluck the day," encourages the 'seizing' or grabbing of beautiful things, like flowers.  It comes from the poem by Robert Herrick:

To the Virgins, to Make Much of Time

 
by Robert Herrick

Gather ye rosebuds while ye may,
   Old Time is still a-flying;
And this same flower that smiles today
   Tomorrow will be dying.

The glorious lamp of heaven, the sun, 
   The higher he's a-getting,
The sooner will his race be run,
   And nearer he's to setting.

That age is best which is the first,
   When youth and blood are warmer;
But being spent, the worse, and worst
   Times still succeed the former. 

Then be not coy, but use your time,
   And while ye may, go marry;
For having lost but once your prime,
   You may forever tarry. 
 

People name their boats, their cars, their dogs,  so I thought it would be kind of cool to 'name' my 'land yacht.'  And, because the phrase Carpe Diem seems to fit me pretty well, I think the name makes sense.  The crowning glory will be finding a way to place the name on the teardrop.  I hope to be able to get a vinyl decal to put on the back of the Teardrop at some point in the future.  The next question is what should it 'look like?'

When in doubt, simplicity rules.  That rules out all of the designs at the top of the page.  I am much more inclined to choose something much more basic such as:


Or, even something simpler:

capre diem


Project Breakdown

Here are the steps I came up with in the last post.  I am going to break each of the steps down and include as many of the details as I can.  I will add specifics if I can, which I hope will make the process of completing each step easier for me in the long run.

  1. Install hitch
     2.  Take ownership of the Teardrop/bring it home
    • I will need to drive to Cookeville, TN This is about ten hours.  
    • When I get there, I'll need to fix the trailer lights and inspect the axle and wheel bearings.  If the lights don't work, I may need to use a magnetic set of lights for the short term.
    • Will I bring Jack with me?
    • Will I stop and visit with Larry, who lives just north of Dayton?

     3.  Clean and perform 'basic' structural and cosmetic repairs to Teardrop and trailer
    • Once I get the Teardrop home, I will carefully clean the interior and exterior.  
    • When the interior is clean and dry, I will inspect the underside of the trailer and floor.  Hopefully, they will be in satisfactory condition and the floor will not need to be replaced.  If it does, that sets in motion an entirely different set of circumstances.  For the sake of argument, let's say it DOES need to be replaced:
      • I will need to unbolt each of the bolts which go through the floor and through the steel frame of the trailer.  
      • Somehow, the cabin will need to be lifted off of the chassis.  
      • The floor will need to be replaced with a suitable plywood sheet.
      • The plywood sheet will need to be weather proofed using roofing tar.  (This might need to be done even if it is not replaced as a way of weatherproofing the bottom.)
      • If the cabin is removed, it is conceivably possible to 'finish' the interior of the cabin with 'large' sheet goods.  If this is the case, the entire electrical plan would have to be implemented before the cabin could be rejoined to the chassis.
      • Lastly, the cabin would be re-attached to the trailer chassis. 
    • The frame and tongue will need to be cleaned with a wire brush and treated with several coats of Rustoleum black spray paint.
    • The inside of the cabin and floor will be completely painted with high gloss exterior house paint.  This should change the aesthetics of the interior greatly.
     4.   Add 'temporary'  lighting elements to cabin and galley
    • I will install temporary lighting in the interior and galley.  I have several battery operated LED lights that should work quite well for this application.
     5.  Electrical plan
    • This is going to be one of the most challenging elements for me.  I will need to solve several problems.
      • First I will need to decide whether or not I will integrate AC and DC power into the design. 
      • Next I will need to think about the 'need' of AC devices like air conditioners, etc.  Their inclusion opens up many design obstacles such as ventilation, security and most importantly infrastructure of the electrical system.
    • Once I've decided on the above elements, I will need to layout the design.  Thankfully, I've been able to study the schematics of many builds on the forum.  At this moment I am leaning toward both an AC and DC system; albeit a simple design.  I do not think that I will include the AC unit in my design.  Here's why:
        • I prefer camping in 'primitive' sites; these often do not have power.  
        • I don't have anything against other campers, but when I 'camp' I prefer to be away from others where I can enjoy the out of doors.
        • I don't want to have to use a generator (which is often not allowed in campsites).
        • I plan to add the Fantastic Fan to the Teardrop.  This works as both a vent and a fan.  I am pretty sure that with the addition of a secondary fan in the cabin, I can create enough of a breeze to keep us cool in most conditions. 
        • Planovet developed an innovative 'power center' that I really like.  I want to integrate his ideas into my electrical plan
        • I would like to plan ahead for adding a solar panel.  I need to research this so that when I do add the solar panel I won't have to undo any of my earlier work.  If there is a way to 'add' the cable ahead of time, I would like to do that. 
    • What specific electrical fixtures will I install?
        • Reading lights in the cabin
        • Dome light with both red and white LED's
        • Porch lights: small colored LED's
        • License plate light
        • New tail lights
        • Marker lights on top of the hatch and along the sides
        • Galley Light with both red and white LED's 
        • Fantastic Fan/Vent; thermostat controlled, rain sensor, etc.
     6.  Cabin and galley design

    • As briefly mentioned above, the cabin and galley will be insulated.  The design elements will also need to include the cabinetry.  Again, the forum has been incredibly useful in developing a series of 'must haves' that I want to include in my designs.  
    • I hope to be able to create the galley cabinets out of birch plywood that I will varnish in order to preserve its gorgeous qualities; in my perfect world, I would have used the same finish for the interior.  Due to the constraints of the door width, however, I will probably not be able to finish the interior in large sheets of birch.  Instead I'll use regular BCX plywood; in 1/2 or 1/4 inch thickness.  This will add about 1 1/2 inches to the interior.
    • I am considering adding a layer to the floor too.  Not sure if this is a good idea or not. 
     7.  Install electrical system
    • Once the electrical design is in place, I will need to install wooden furring strips.  These will be adhered to the aluminum with a special adhesive tape. 
     8.  Insulation of cabin and hatch
    • The furring strips will then be the ribs that will hold the insulation panels (at least 1" of extruded styrofoam).  On top of the foam will be a thin skin of plywood panels.  The panels will be attached to the ribs via screws.   

     9.  Interior skin/hull liner installation
    • For the cabin, I plan to use a hull liner for the walls.  From what I've seen, the marine hull liners will be perfect.  It will conform to shapes and will 'cover' any imperfections in either the aluminum or the plywood skin.  I am thinking of using a light charcoal colored hull liner.
     10.  Installation of cabin cabinets
    • I am planning on painting the interior cabinets glossy black.  I think the contrast between the gray hull liner and the black cabinets will look wonderful. 
     11.  Installation of galley cabinets
    • The galley cabinets will be varnished birch plywood with silver polished hardware.

     12.  Repair aluminum skin
    • Replace rivets with smooth covered rivets
    • Replace edge and other moldings
    • Add drip gutter above doors
    • Add diamond plate to front of Teardrop
    • Install additional exterior lighting
    • Replace hatch handle

     13.  Lubricate axles and bearings
    • Research how to 'pack' the trailer's bearings
    • If needed, repair the bearings 

     14.  Add trailer elements
    • Weld/bolt stabilizers to rear of trailer
    • Weld additional support and diamond plate to the front of the tongue
    • Add 'rails' to the side of the tongue diamond plated area
    • Add a tongue box

     15.  Polish aluminum skin
    • Sand with 200/400/800 grit
    • Polish with yellow and then white pads (see Youtube video on how to do this)

My first "good look" at my Teardrop

Hans and I had been trading texts for the past few days; he was finally able to get to his garage where the Teardrop is being stored and send me some detailed images of the Teardrop.  These images served to excite, puzzle, frustrate and amused me.

Hans and I are approaching the Teardrop from slightly different angles.  He is all about building onto what is existing.  I am more of the mindset of ripping it out and customizing the whole thing to meet my needs.  Those needs, are always evolving.  Hopefully, with my new, slower approach to the project, I will be able to be wise enough to know when to stop 'thinking' through problems and planning and when to begin implementing.

Here are the most recent images I have of both the interior and exterior of the Teardrop.  I will add my thoughts and notes about them as they are posted.

 Ok, I am going to need to do some wire brush work on the tongue of the trailer; I would anticipate a good amount of the underside of the Teardrop will also need to be scraped and painted over with Rustoleum.  It's interesting to see how it meets the frame of the trailer; that hole there in the center must be where the electrical enters the cabin. 
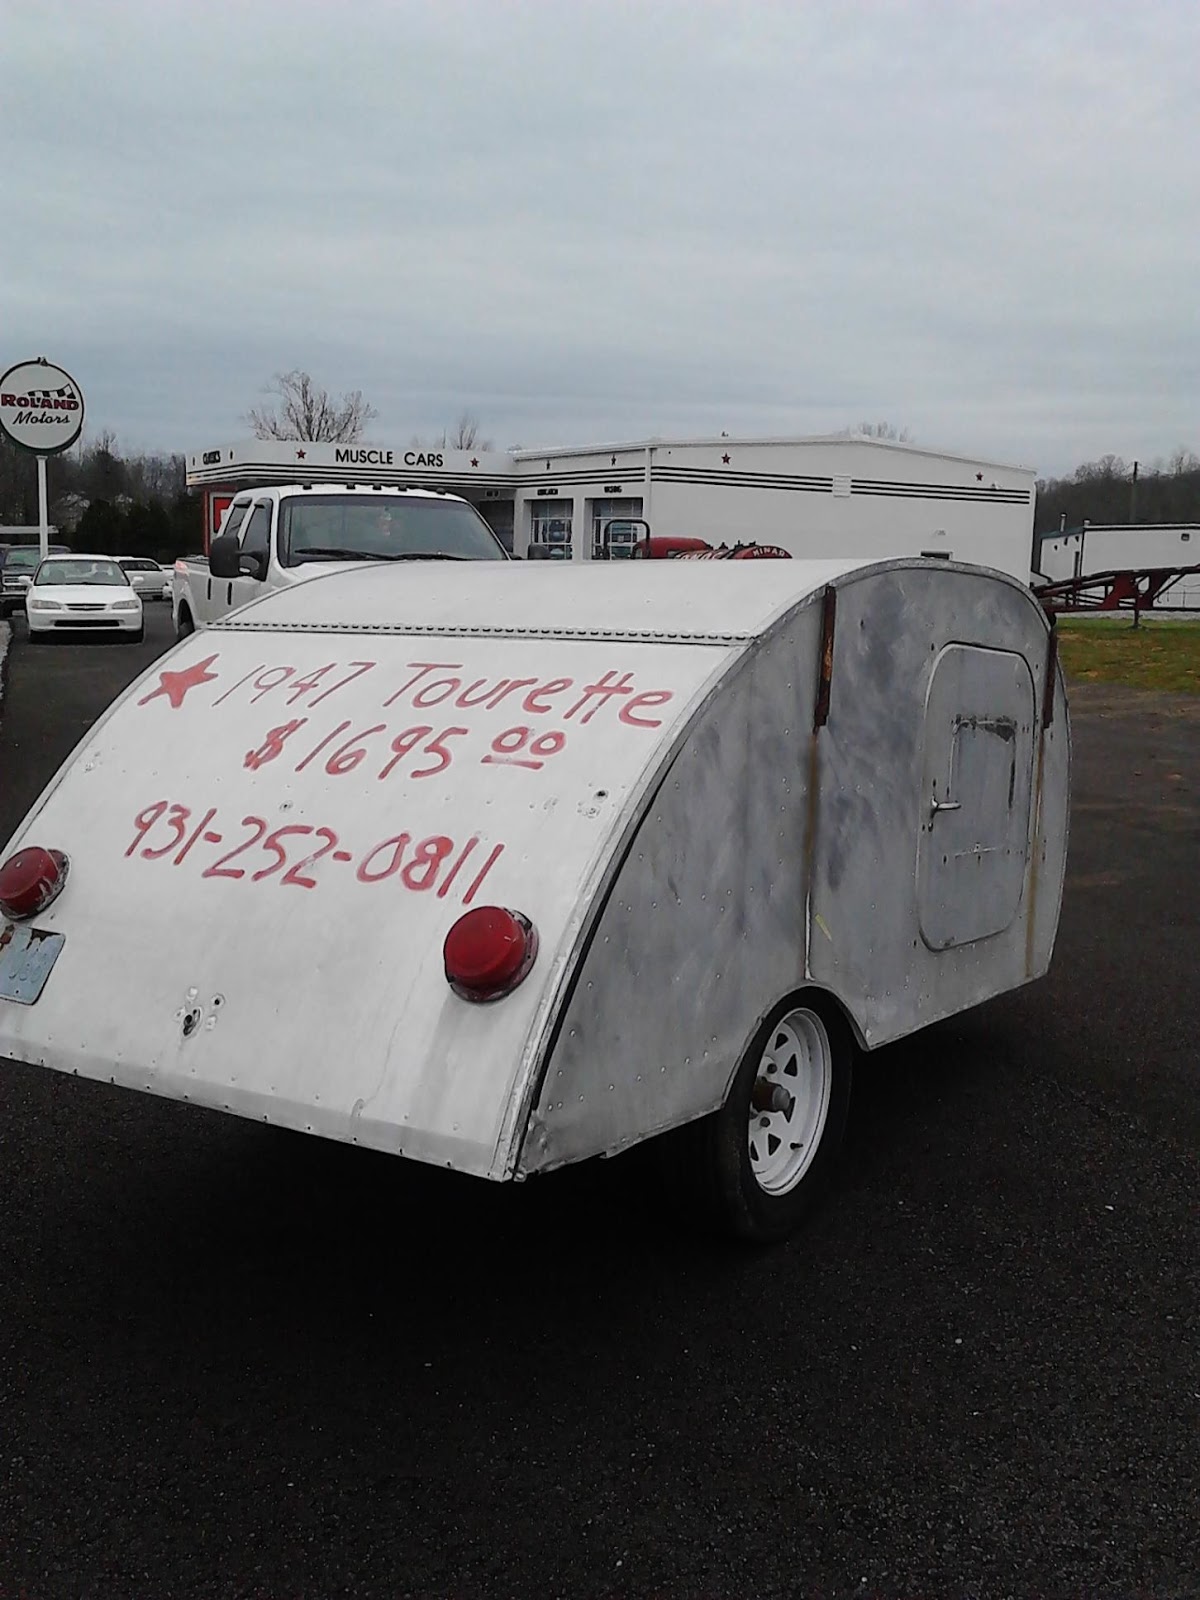
 Yucky looking tail lights.  I'm hoping that I can add new tail lights to the tear.  I'm wondering how the skin will look when I remove those old tail lights.  It's fun seeing the old license plate.  I can't make it out, but that might be able to give me some clues on the ownership chain of the Teardrop.  I'll also be adding a license plate holder to the Teardrop.  I would prefer to have one in the center of the hatch and will have it lit with an LED too.
 Okay, a bit more of a view of the tongue.  I'm not sure what the metal angle iron is there at the right of the image.  I researched a little and found out that the triangular piece that is connected the the frame is original.  It pivots up and is stored on the small metal 'arm' that is just below the hole in the cabin.  I'm not sure how this will impact the addition of a crank down arm.  I would like to add one, I think.  Additionally, I would like to add stabilizers to the rear of the Teardrop.  I've seen where they can be bolted on, but I am not sure if I will have access to the frame in the way they are required to be added properly.  May end up having them welded along with additional 'hitch' receivers to the back and side so I can add additional elements, tables, bike rack and so on, to the Teardrop.
You can see, above, the stabilizers and the additional 'receivers' that are welded to the frame.  These receivers allow you to add all kinds of elements from tables to flag poles, awnings, etc.  You are only limited by your imagination.  It would be smart to have these designs in place when inquiring about how the cost of welding to the frame.  Mental note: plan all possible welding ideas for initial consult with the welding shop.
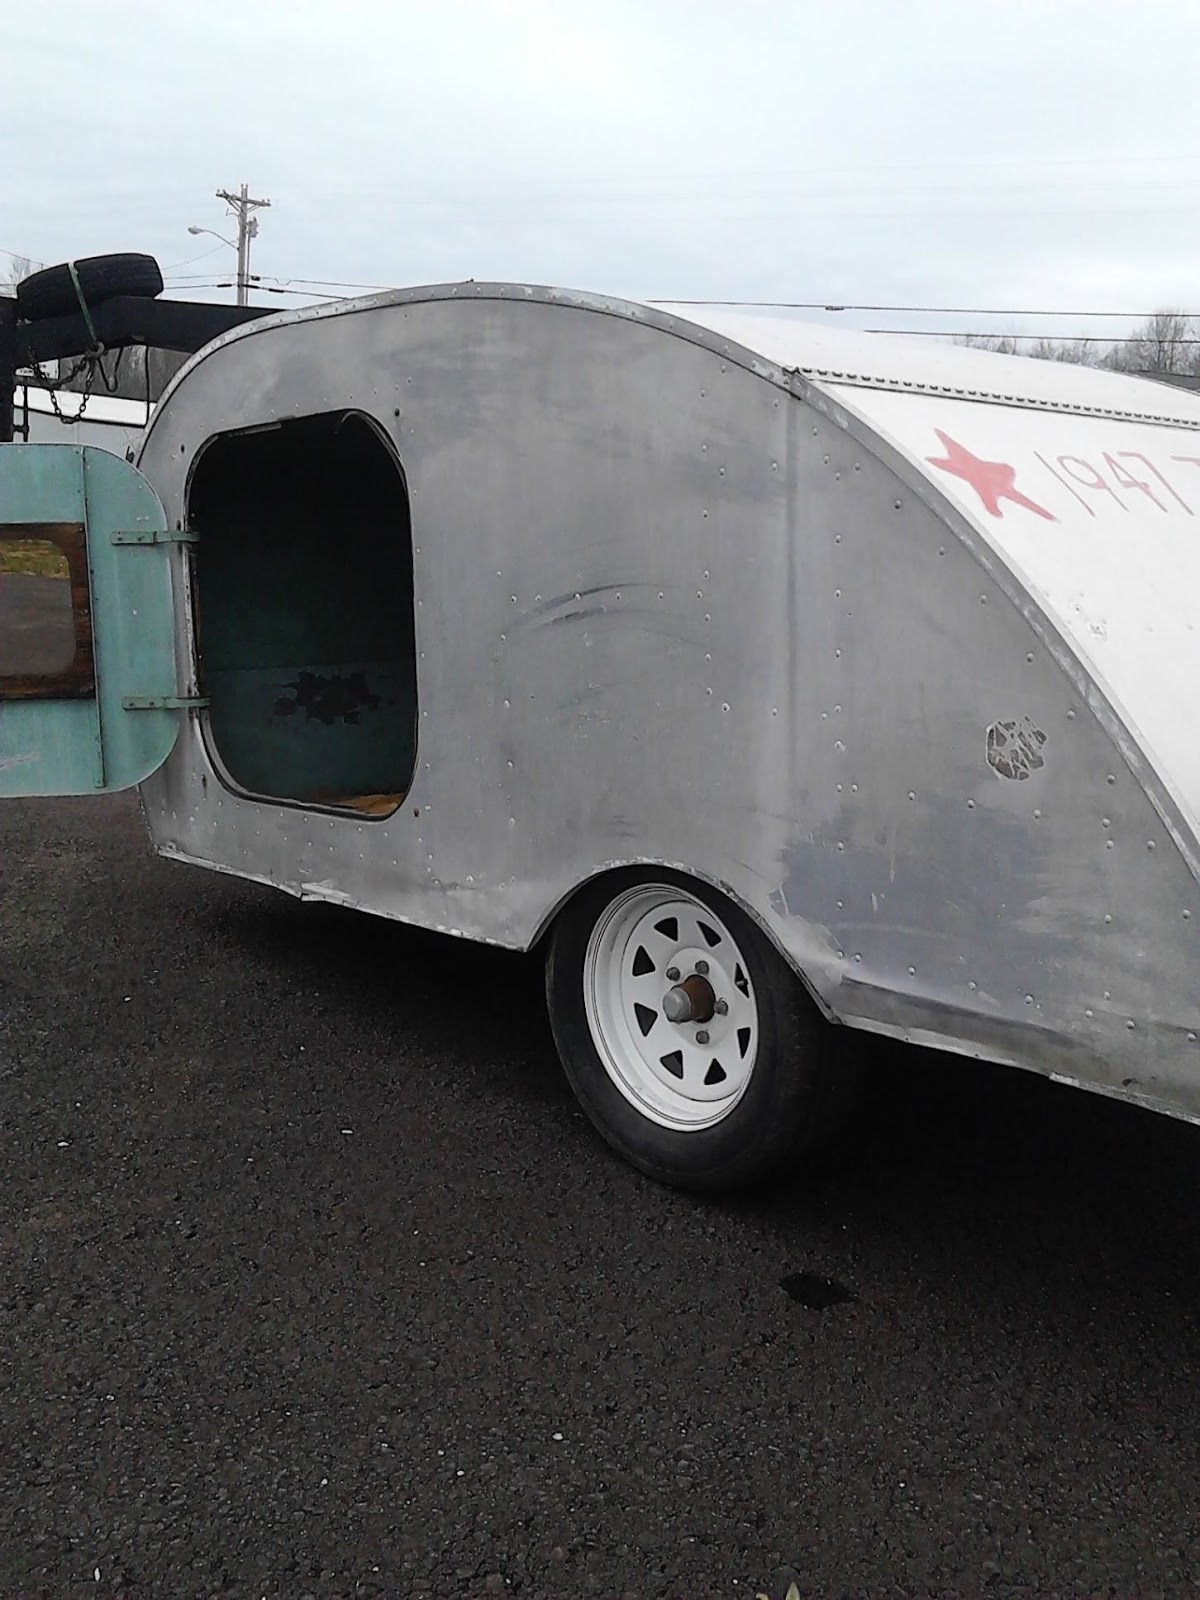
 Looks like those seals are going to need to be replaced ASAP.  Larry, my Tourette friend, told me that the seals of the 1947 Ford truck fit the doors to the Teardrop perfectly.  Now, where does one find a 1947 Ford truck seal?  This was also the first time I could see the plywood floor.  It looks solid.  Larry told me that I may not need to replace the floor; that impacts my decisions about how to 'finish' the interior.  If I don't remove the cabin from the chassis, I will only be able to bring sheet goods into the cabin that will fit through the door.  I also noticed the smooth radius of the wheel well for the first time.  This would be hard to 'cover' with wood, another consideration of how to 'cover' the interior. 
 Another yucky tail light.  One side note, the edge trim of the hatch looks sound here.
 Door handle hardware.  Interestingly, the door handle hardware looks completely sound.  I may be able to simply clean it up, spray it and use it over again!  I am getting my first look at the window assembly.  I still don't completely understand how it operates  I think there is to be a screen there, but that makes me wonder, how to you open the window with the screen in place?  Does it crank out?  Not sure, but that will be fun to explore. 
 Aha.  Another, more full view of the tongue.  I am glad to see that the length of the tongue is substantial.  I have plans to add a tongue box which will be part of my electrical system.  I would like to store the battery and possibly the battery 'tender' inside the tongue box.  I've seen some nice ones in the stores and online, but am considering making my own.  One additional note about this area of the tear; I am thinking of adding 'diamond plate' to this section.  It would reach from the frame up about four feet.  This would serve many purposes. One would be to 'repair' the damaged finish you can see in the image.  The other would be to solidify the skin and provide a bit more rigidity to the frame and cabin. 
 48" hypotenuse provides a substantial 'base' for the tongue box and storage 'gates.'  In addition to the tongue box, I would love to add a 'shelf' where many things, like chairs, etc, can be stored.  I have some excellent images in my idea binder of how this is accomplished.  Here is one of them.
In order to make this work, I would need to have some welding done to the chassis frame.  I'm finding that this is not that terribly expensive.  It would just make sense to have all of my 'welding' done at one time.  I'm not sure what the 12 volt receptacle is for there, but I'm curious.


 The galley.  Despite the 'historical' nature of the Teardrop, I plan to remove these cabinets.  One interesting note is that I thought this would be 'impossible.' Well, it turns out that with a $20 tool called a pop riveter, I can easily repair holes made when the cabinets are removed.  And, to remove them, one simply needs to punch the rivet carefully and then drill through the rivet with the same size drill bit. 


Another view of the interior.  Again, the floor looks solid.  The doors are interesting to me.  It looks like the 'window' is open.  I again am curious, is there some sort of 'limiter' on the window?  How does it open and close?  I'm also noticing how the door frame is stiffened by wood.  I will be interested to see how that will impact the insulating and coverage when I get to that point.
 A close up of the 'ice box' that was standard on the 1947 model.  Ice would be put in the bottom, I think, and the 'box' would have kept things chilled.  It doesn't look very insulated.  Interesting that they used steel, which rusts, for the interior.  I imagine steel has better properties for absorbing and holding the ice's cold temperatures.
A view of the area where the three burner gasoline stove would have sat.  In other images I wonder how the lower cabinet was utilized.  It seems like that is a very deep distance.  The upper cabinets are missing most of their doors and are riveted to the outside of the skin.  I plan to add a plywood 'side' to both edges when I have successfully removed the cabinets.

 
 My first interior shot of the front of the bulkhead.  I can take away a lot from this image.  First, the interior is a mess and needs to be scrubbed and cleaned carefully.  Second, the wires are shot.  I don't even know what those wires in the top right of the frame go to.  Hans did tell me that the trailer lights currently do not work.  I will need to have that fixed before I can begin the voyage north with the trailer.  I can see that there were sliding cabinet doors; one of them is missing.  I would really like to add a 'headboard' to the cabin when that time comes.  I love the way my design model turned out as you can see from the image below:
I'm not sure if we'll end up adding the 'moon' roof, but the more I work on my designs and this remodel, I do think that I will go with a light hull liner over insulation and plywood inside.  Finally, like my design, I will create a 'headboard' that has storage in it.  The headboard will be taller than the model to most likely maximize this space.

 Whoever the owner of this Teardrop was, they clearly didn't bother to do any cleaning.  I chuckle a little at the color choice of the cabin.  That turquoise blue reminds me of the 60's and my trips as a young boy to visit my Great-Grandparents in Florida.  I'm going to clean, sand and paint the entire interior super high gloss white.
 The galley.  Note the one bulb.  The original add for this model says, "Wired for electric lights."  After seeing so many beautiful designs and build logs, you can't go any more basic than this.  I would like to use flexible conduit, insulation and a plywood 'skin' to 'beef' up the galley and make it look much more modern.  I will likely use a galley light that is an LED and can be switched from white light to red for night vision protection.  The same will be true of the interior dome light.  I think its neat that the 'struts' that hold the galley up appear to be in very good shape.  I am not sure if those will need to be replaced.  It looks like a good cleaning and possibly a coat or two of Rustoleum and then WD40 will put them back into pristine condition.

 Cabinets; they look pretty simply connected.  Drilling out those rivets will be a slow process.  Key word, 'slow.'  I'm listening Larry. 
Somewhat 'big picture' image.  The galley hatch looks solid.  The sides look square and true.  It's got good bones. 

Thursday, January 17, 2013

Reality Check...

It's time for a good old fashioned reality check.


Above, the most perfect teardrop.  The mythical $17,000 rarely seen Vacations in a Can species.  Often coveted, rarely bagged. :)


In my excitement and giddiness, I seem to have lost track of reality a bit.  Not an uncommon event in my world.  Larry, my fellow 1947 Tourette owner friend and classic car restorer, warned me to make a plan and go slowly.  "Don't rush," were his exact words.  Of course, like a little kid on Christmas morning, I want to plow ahead. 

The reality of the costs associated with the full restore have started to settle in and have forced me to be a bit more realistic, both financially and chronologically.

So, I've decided to channel my excitement into making a detailed and elaborate plan.  First I'll lay out the steps in order and then I'll go back into each step and break down the steps that have to be completed, what materials need to be purchased and what problems I anticipate.  Then, I will slowly begin working through those steps.

Here are the broad strokes; the general steps that need to happen in order to complete, if that is ever possible, the Teardrop Project.

  1. Install hitch
  2. Take ownership of the Teardrop/bring it home
  3. Clean and perform 'basic' structural and cosmetic repairs to Teardrop and trailer
  4. Add 'temporary'  lighting elements to cabin and galley
  5. Electrical plan
  6. Cabin and galley design
  7. Install electrical system
  8. Insulation of cabin and hatch
  9. Interior skin/hull liner installation
  10. Installation of cabin cabinets
  11. Installation of galley cabinets
  12. Repair aluminum skin
  13. Lubricate axles and bearings
  14. Add trailer elements
  15. Polish aluminum skin
Wow.  When you spell it out so logically, it seems like a huge list; one that while able to be accomplished, feels like a slow process.  In the words of Larry, "Go Slow."  In my next post, I'll begin breaking down each of these steps.
 

Saturday, January 12, 2013

The Dream Binder

Above:  I love the color of the fender and the rims with the half moon hub cap.  This is one of my favorite images from my Dream Binder.

So what do you do when you can't actually work on your Teardrop? Well, if you're me, you start by dreaming about all the fun you will get to have. I have been collecting images for months of Teardrops through Pintrest and the Teardrop forum, so I printed them out, hole punched them and put them into a huge binder in their various categories.

Then, I started going through them making notes of things I like and dislike. Things I want to add to our Teardrop and things that I might want to add in the future.

Working through the images it becomes pretty clear; I want reading lights, porch lights, ventilation fans and a variety of power outlets. Some designs include both 12v and 120v power. Initially, I'm not so sure I want to add this, but the more I read and learn it seems to make sense on many levels. By having both, you can run an inverter which will allow you to run traditional appliances, chargers, etc either in the cabin or in the galley. Initially I thought I'd go with the simplest system, only 12v but now I see the value of a diverse system. Another piece of the system is the ability to plug in to 'shore power.' You can plug in to a power source while camping in 'powered' sites, or when you get to you destination and you can find a power source. I'm thinking that I will eventually add a solar panel to the system which will allow us to charge up while traveling and when in camp too.

Right now, I'm mostly thinking about how I'll Insulate and add the wood to the interior. As I said earlier, that should be much simpler when I remove the cabin from the chassis.

I asked Hans to send me some more photographs of the Teardrop, especially inside the cabin, galley and the hatch.

Those images will help placate me a bit longer. For now, it's. back to my dream binder.

Wednesday, January 9, 2013

Now that I 'own' it, how am I going to renovate it?

Once again the Teardrops and Tiny Trailer Forum has been a lifesaver.  I found two owners who have 1947 Tourette Tourers just like mine on the forum.  Both of them were generous with their insight and advice.

One of them did a complete overhaul of the trailer.  He separated the hull from the chassis and replaced the entire flooring.

As I'm learning more and more about what went into that overhaul, I'm thinking that I will probably do something very similar to my Teardrop.

I started asking questions about how to insulate and 'skin' the interior of the Teardrop.  I received several excellent responses about what types of glues and foams to use.  And then I had one of those moment where I realized I had completely blown it.  I had visions of me covering the interior with foam insulation and single sheets of birch plywood and lacquering them to a beautiful finish.  How on earth did I plan on getting those large sheets of birch plywood into the interior?  Through the door?  Duh!  I suddenly understood why one owner used cedar strips to do the job: they could easily be inserted through the doors!

I'm sure this is just the first of many, many more revelations I'll have over the next few months.

Larry and Jill, two owners from just outside of Dayton, Ohio were very kind to e-mail me and answer a slew of questions and give some terrific advice.


This is Larry and Jill's completely restored 1947 Chevrolet Truck and 1947 Tourette Teardrop Trailer.  Sweet isn't it?

As of now, I'm thinking that I will remove the cabin from the trailer and upgrade and repair it as needed.  Then we'll be able to access the interior of the cabin from underneath.  This will allow me to insert the full size sheet goods into the cabin and the roof after I've wired the entire trailer for lights and electricity.

That's my next task:  figure out what I want, electricity wise, inside the cabin and what additional lighting features and switches I want to add to the exterior too.  I'm going to study the forum posts on these ideas and hope to glean as much as I can from others mistakes.


"I'm Looking at a 1947 Tourette Teardrop Trailer..."

Christmas Day.

On the way to Ohio, we passed a Teardrop Trailer and the whole family gave a big thumbs up to the owners.

Powell, Ohio.  We are off to take the kids sledding around the corner from my brother-in-law's house.  As we sat in the car warming up, conversation drifted to Teardrops as it is want to do when I have a captive audience.  I shared a few images I had on my phone of a Teardrop and told Hans about my dream to build one and use it as the backbone of my future road trips with my kids and later with my wife.  Little did I know what would come of this innocent enough sounding exchange.

A day later, Hans is back in Tennessee and he called me, something I don't think he's ever done before.

"I'm looking at a 1947 Tourette Teardrop Trailer...just like the one you showed me in the picture."

After I processed what he was saying, I allowed myself to be politely excited. "Send me a few pictures if you would."

I took a look at the pictures on my phone, but didn't give it too much thought.

 I knew we had some projects that we wanted to pursue that were higher up in the cue than buying a 65 year old Teardrop Trailer.

My wife asked to see the pictures.  She seemed very interested.  She asked Hans to send more pictures and to go and open the doors, check the hatch and so on.

A few more photos came as well as a few phone calls that assured me it was a steel framed trailer and the Teardrop is all aluminum.  It has an aluminum frame and aluminum skin. 

"You can't go wrong here."  The next text said.

I started to get excited, but was guarded and cautious.  Erica brought it up with me a few more times.  I decided to give the owner a call and ask about it.  He knew very little.  He had picked it up at a swap meet in Georgia and has had some interest in it.  He said he would be raising the price in the spring.  The price was not negotiable.  In truth, I had a very hard time understanding the man because of his thick southern drawl.  I asked Hans to call and 'translate.'

A few more days passed and we got more information about it.  We had a few conversations about whether we could do it.  Whether we should do it.  I researched the trailer and found the original 1947 advertisement that was in Popular Mechanix.

We found out that this trailer was in fairly pristine shape.  It still had the original Ice Box and all of the interior was bare aluminum as it had been when it was created, over 65 years before.

Erica helped me see that if we bought this, it could help my 'dream' happen much more quickly than if we started from scratch.  I started to allow myself to get excited.  A couple more phone calls to Tennessee; I needed to make sure that Hans could store it for me until I could drive down there to pick it up.  I needed to make sure the funds would be in place to close the deal

Monday morning, we confirmed.  It was all going to happen!  Hans was going to pick it up and let me know when he had the Teardrop in his possession.

About 5:30 p.m. that evening, I was on my way to Tae Kwon Do with my son when a text appeared on my phone, which was in the cradle near the dash.

"Sorry, he sold it."

I let loose a slew of obscenities  unlike any I had spoken in as long as I can remember.  I was heartbroken.

"What's wrong Dad?"  Jack asked, worried by my string of obscenities.

"Uncle Hans just told me that the guy sold the Teardrop!" I was crushed.  I was heartbroken.  I was angry.

"Oh no!"

About that time, the phone buzzed again and the little green bubble from Hans showed another text.  I didn't have the heart to read it, thinking it was just more bad news.

"Sike!  Ha ha!"

"Grrrrrrrrr!" I growled.  Hans, always the trickster sure did get me.  I was through with texts.  I wanted to speak with him.

Thankfully, all was well.  He had it at home.  There were no problems and he had it safely in storage.

Now, the planning can begin!

Time to Make a Model


I found out that the teeny tiny trailer I had seen was called a Teardrop Trailer.  A few strokes of the keys and Google delivered hundreds of images of these tiny campers in all shapes, sizes and colors.  A few more keystrokes brought me to the Teardrops and Tiny Trailer Forum where people of all sorts share their love of all things Teardrop and much more.  I spent a few days just reading hundreds of posts and looking at the images.

From there, I introduced myself on the board and was immediately welcomed into the forum.  I had invitations to attend gatherings in my area and to come and see a teardrop in person. 

I started thinking and dreaming about what 'my' Teardrop might look like someday.  I'm handy and love working with wood, so I imagined that I would build it myself.  I started exploring profiles and soon found myself building a scale model of my dream Teardrop.

I spent 12 hours meticulously constructing my 1/24th model, all the way down to awning and bedding.  It turns out that my model was perfectly built for Barbies and all of my daughter's bedding accessories temporarily found a home inside my model.


This was going to be it.  This was as close as I was going to get to making my own Teardrop until I finished work on my library school certification and a few bigger projects that we had planned for our house.  I  had come to an understanding with myself and was pretty content to live vicariously through the forum until my 'time' had come...or would I?