Showing posts with label foam. Show all posts

Monday, June 17, 2013

Hot Day!

The temperature outside the teardrop on the patio was 102 degrees (in the shade) and the temperature inside the teardrop was 97 degrees.  I really don't like hot weather; especially when I want to work outside.  I cannot imagine how the guys who work on the roof or on the roads do it.  I took lots of breaks, drank lots of cold water, and moved my zero gravity chair into the garage to cool down.

Not a lot of photos to document my work today.  


I made the hardware for the window curtain rods and painted them glossy black.


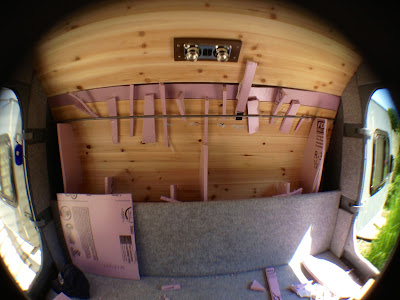
I carved the foam pieces for the bulkhead.  Covered them in foam and then installed them.  Turns out the glue (PL 300) did not work well on the insulation (1/2") that I used on the bulkhead.  I didn't think that very thin plastic layer on top of the insulation would be a problem, but the glue only 'stuck' to it, not the actual insulation.  So, I needed to pull out four of the strips of cedar and re-glue them.  I ended up using Gorilla Glue.  I also used a little bit of it on the foam covered pieces along the wall of the bulkhead.


Used the marine grade contact cement and clamps to glue the foam door panels to the door.  They turned out fantastically!


Very carefully created a pattern for the cut out for the mattress.


Traced the pattern onto the foam mattress.  Used a $14 electric knife to cut the two small wheel well sections out; ended up with two really nice pieces of foam that I may turn into a back rest or possibly a couple of pillows for the teardrop.  Couldn't believe how easily I could cut the foam.  Two minutes and it was done.  The mattress pads fit right over the cut outs; we may not even need to customize the covers. 

Not quite as productive a day as I would have liked, but all in all it was successful.  Tomorrow is the day to start working on polishing the body.  Not sure what new experiences that will bring for me!


Saturday, June 15, 2013

Slow Saturday

Even though I woke early, today was a slow day.  I didn't get my big task, the doors done.  But, I did find lots of great uses for the 'extra' cedar.  In fact, I don't think I will end up 'wasting' any of the cedar.


Task one was to take down the bracing from the night before and see how the molding trim worked.  In short, it didn't.  I guess I should have known that the wood really needed to be soaked longer and possibly put on a 'form' in order to achieve the tight radius to the left of the door.  The trim did not bend enough.  I tried nailing it with my brad nailer, but it was not strong enough to hold the pressure of the bend.


Off to Lowes for a trim run.  I found a piece of molding; believe it or not it is plastic that is 'colored' a 'natural' color.  It matches perfectly to the natural cedar and it bends a whole lot more.  I decided to use Liquid Nails and my brad nailer.  It worked pretty well; again, the trouble spot was the tight radius to the left of the door.  I actually left that section braced and will see what happens after a night of bracing and the Liquid Nails.


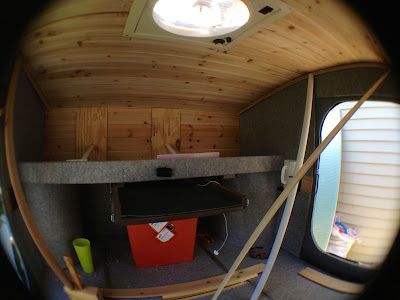
The picture before the one above was a bit out of order.  I added a panel of insulation to the shelf.  It's not glued in; again, if I ever needed to get to the wire runs, I can by simply lifting the insulation panel up.  


I used liquid nails to glue the cedar to the foam.  Much happier with the tack of Liquid Nails than the PL 300 adhesive.  


Almost finished.


Done.  Look how nice that trim piece pulls the ceiling and the back wall together.  I am very pleased with the 'plastic' trim piece.

I did try out the baskets before adding the insulation and the cedar, but this was my confirmation.  They fit perfectly and the lip of the shelf (which has a piece of foam glued to it by the way) holds them from moving forward.  There is about an inch of 'wiggle room' in the back.  You would think I made it that way!


You can see that the back of the totes fit exactly to the top of the cedar strips in the back.


Picked up a can of this Leak Seal.  I wanted to use it in the wheel wells.  I decided to go over the wood 'angles' I used to make the wheel well in the galley.  They've been treated and painted with the undercoating, but I found teeny tiny spots that missed the undercoating.  This just gave me an extra coat of comfort.


Here's a better shot of the flange I installed around the vent.  It looks great!


The porch light switch installed, glued and braced for the night.  Again, I really like the way the cedar accent looks.  It ties the design together nicely I think.


Finished up the little nit picky pieces in the bulkhead.  The only thing left to do in that area is to cover the side pieces of foam in headliner and glue the cedar strips to the 'floor' of the cabinet.  I'm thinking this is where we'll keep our shoes at night.


What do you when your teardrop is 5' wide and all the strips of cedar come in 8' lengths?  Well, you use those strips to cover the shelves and you line the built in storage bins to give them a super nice smell!


With some stuff in it!


 The back storage bin.  


I had been thinking about how I could install some simple curtains for some privacy in the teardrop.  Well, I found a solution.  Before the windows were installed, there were two angle irons that gave rigidity to the door.  When I removed them, I had to fill the holes with bolts and nuts.  I had made them very short to just 'dig' in to the foam core that will be glued to them.  Well, if you look closely, there are three nuts above and below the molding of the window.  If I were to simply add a larger bolt (one that would go all the way through the foam/headliner, I could use that bolt to anchor a curtain rod.  Aha!  Solution!  Now, to decide on a nice looking rod and to purchase the right length of bolt!  Then I get to choose a cool fabric that will pull everything together!


One last view of the shelf area.  You can almost smell that lovely cedar!  I'm so glad that I did not put 'cabinets' in this area.  By keeping it a shelf with the bins, I have a lot of flexibility.  Plus, by making this out of cedar, I've ensured a great smell, low chance of 'rot' and it will keep bugs out.  I was initially concerned about not 'treating' the cedar.  I was wondering if the cedar smell would ever be 'too' much.  Not a problem.  It smells great, but it's not too much at all.  I couldn't be happier with how it is turning out.

Father's Day tomorrow.  Would love to get both doors finished.  If I can get them done and installed, and then those last couple of things in the bulkhead, the Carpe Diem will essentially be ready for travel!  Can't wait!

Friday, June 14, 2013

Friday Finesse and Fun!

At the risk of sounding incredibly repetitive, today was an amazingly beautiful day!  70 degrees and sunny.  My perfect weather kind of day!  The Carpe Diem is really coming along and today, as the title says, was a day of finesse and fun.

Started out enjoying my cold water by using my newly installed cup holders!  I love the cedar accent I was able to create yesterday.  


I had originally planned to make a false bottom on the shelf area to hide all my electrical lines.  Turns out I didn't need to do that; I bundled all the wires up and tucked them under the insulation on the far right side.  However, you never want to 'paint yourself into a corner' so to say.  So, I decided to make the back wall panel 'removable.'  It won't be easy, but it is possible to take out the back wall panel, simply by pulling on the top board.  Essentially, I just glued the cedar strips to the insulation.  Then I tacked a cover strip of wood at the top to 'join' the roof and the back wall.  If I ever need to get to it, I can!  This, by the way, was how it looked when I started adding the cedar strips.


All the cedar strips are in place.  Also, take a look at the Fantastic Fan.  I installed the fascia around the fan.  It pulled the roof together so nicely I think.


Bracing in place.  I found using sections of plywood to distribute the force and pieces of PVC pipe cut to length and then smooshed against a small piece of insulation makes very secure bracing.  Notice those cool new drink holders in fold up position!


Top piece in place and glue braced for overnight drying.  Notice the molding strip along the top of the roof over the doors.  More on that in the next photo.


Soaked the two molding strips that will go along the ceiling over the doors.  After soaking them, I braced them in their bended positions and will let them sit overnight.


Bulkhead doors removed.  I decided I would insulate the bulkhead with 1/2" insulation.  Half the thickness of the cabin due to the small area.  I think the insulation will help shield the cabin from the heat that is absorbed when the sun hits that front section.


Insulation loosely installed, waiting for glue and bracing.


One of many leg boo boos I have created by cutting insulation panels on my lap!


Cedar strips in place in the bulkhead.  I realized that the insulation can be used as an excellent brace by wedging it into place and using friction to press back against the surface being glued.

Okay, big task for tomorrow:  trim up the first door's insulation and headliner cover and cover the second door.  I'm hopeful my amazing daughter will help me with that.  If I have time, I may try cutting the mattress to the pattern of the floor.  Yikes.  I'm getting incredibly close to being done on the inside of the Carpe Diem.  That means I will be able to start on polishing the body soon!


Thursday, June 13, 2013

Gorgeous Day!


Today was magnificent!  I love the weather when it is 70 degrees and sunny.  I embraced the sun today and set up my work table on the patio in the glorious sun.  Okay, to be truthful, I slept in late and by the time I got outside the sun had crested and the sun was only partly on the patio.


A perfectly blue sky; the moon is hiding directly in the middle.

My big challenge today was to install the rest of the insulation and finalize the interior electric.  Mission accomplished on both parts.


In this image you can see the switch for the porch lights in place.  I'm going to need to do a little finesse work to install it.  Notice how nice the insulation and headliner look in the corner there.  I will finish the back wall by installing the cedar strips.


You can see in this image that I installed a strip of cedar right next to the door.  This was a cool thing I thought of because I needed something solid to anchor into for the cup holders.  I used 3/4" foam insulation instead of the 1" that I had been using.  With the cedar strip glued to it with Gorilla Glue, it came out to be the same thickness as the covered foam.  Once it has completely set up, I'll install the drink holders.  You can also see in this image how I used the foam to form 'panels' that were then covered with the headliner material.  I actually didn't have to glue them into place.  They are held in place by friction.  The small bolts that hold the door frame in place are all that was needed to hold the panels tightly in place.


After cutting the panels, I used Loctite 300; it is specially formulated for Marine applications and high heat.


Heavy coats on both the fabric and the foam.  Again, this adhesive was formulated to work on foam.  Normal adhesive would 'eat' away the foam.


This stuff had exceptional tack.  It was simple once the fabric was cut and sprayed to make the panels.


Here they are ready to install.


The great thing about doing it this way is that if I ever 'did' need to remove a panel, It would not be difficult to do so.  It is also very simple if I ever need to install any type of hardware on the outside of the teardop, I can simply pull out a panel and attach the hardware; then simply pop the panel back in place.  I am going to put a piece of cove molding along the entire 'seam' between the cedar and the insulation panels.  I tested it out today and it is a 1" cove molding that will bend perfectly.  This additional friction will hold things neatly and give a really nice finished look.


The reading lights look really great I think.  I like the accent color and the way the silver looks against the brown.


 The power port worked great today to charge my phone while I was in the teardrop working.  

Tomorrow I will need to figure out what I will do with the bulkhead area.  Part of me would really like to have the cedar strips and insulation in there.  The other part of me worries that if I insulate it I will take away valuable 'space.'  Not really sure what will go in there.  Probably shoes, jackets, rain gear; maybe even fishing poles?  I'm sure my wife will have some good insight on what to do there.


The teardrop this evening as I was finally cleaning up at 9:00 p.m.  It was a good eleven hour work day!

Sunday, June 9, 2013

Insulation and the Smell of Cedar

A successful, but shortened weekend.  I wasn't feeling great this weekend, but I did manage to get a couple of things mostly finished.  I installed the insulation on the ceiling.  I used the PL 300 adhesive, which is especially formulated for foam board.  It seemed to work well, but it did not have as high an initial tack as I wished it had.  I ended up needing to brace the ceiling panels.  I suppose I could have been more methodical about it and cut specific pieces of wood to brace the ceiling, but I just used whatever I had in the workshop.


I let the insulation cure overnight; actually I ended up taking two evenings to get the whole ceiling done.  I did the front one night and then the back the next.  I would have liked to have done it all in one session, but the bracing that was needed slowed me down and made it kind of difficult to maneuver inside the cabin.


I had some help from my amazing daughter.  She helped me cut the material to cover the door insulation.  This was partly experimental and partly finesse work; she is much better at this than I am.  Plus, I loved that she was taking part in the process.  She'll really appreciate the doors a lot more now!  We'll use the spray adhesive to hold this all in place; it's pinned now so that we could experiment with how to apply it.


Fashionable, even in the workshop!


One door prototype ready for installation.


I invited my wife out to give her insight on how to proceed with finishing the ceiling.  She was not a big fan of the carpet on the ceiling.  Instead, she suggested, maybe we could use cedar or tongue and groove pine.  She was right; the finish would not have been what I wanted on the ceiling, no matter how carefully I tried to install it. 

 So, I went to the hardware store and purchased some incredibly aromatic cedar.  I wish there was a way to capture the lovely smell!  I used the 1/4" thick cedar on the ceiling and it worked beautifully!  The only thing that was a little tricky was getting it to 'stay' on the ceiling.  I was using the PL 300 adhesive for foam board to hold the strips in place.  That worked okay until I got about four strips in place and the combined weight started to pull them off.  


I purchased a brad nailer at Lowes and tried using 5/8" brads every six inches or so.  That sort of worked, but the brads were only anchored into the foam; so they didn't have much holding power.  I ended up needing to brace the ceiling, which made working a bit tough.  You can see from the images that I finally figured out that using one thin piece, which bent, allowed the pressure to be spread across the entire area being supported.


I finished the entire ceiling today.  I'm thinking about putting it in the bulkhead section too.  It would make the cabinet/closet a bit nicer and would make it smell great too!  The Fantastic Vent was going all day today and made working in the cabin bearable with the sunshine pounding down on the teardrop.

One really interesting thing I discovered this weekend.  The teardrop's temperature gauge showed that the insulation is making a huge difference.  Without the insulation, the interior temperature rose to over 114 degrees.  With the insulation, the highest it got this weekend was about 80 degrees.  It was a little cooler, but still, that shows that the one inch of insulation is making a big difference!

After letting the ceiling 'cure' overnight, I'll be anxious to add the weather stripping seals and then try out the door with the insulation.  I'm looking forward to receiving my baskets this week.  One last week of school responsibilities; even so, I should be able to do some work each evening.