Showing posts with label storage boxes. Show all posts

Saturday, June 15, 2013

Slow Saturday

Even though I woke early, today was a slow day.  I didn't get my big task, the doors done.  But, I did find lots of great uses for the 'extra' cedar.  In fact, I don't think I will end up 'wasting' any of the cedar.


Task one was to take down the bracing from the night before and see how the molding trim worked.  In short, it didn't.  I guess I should have known that the wood really needed to be soaked longer and possibly put on a 'form' in order to achieve the tight radius to the left of the door.  The trim did not bend enough.  I tried nailing it with my brad nailer, but it was not strong enough to hold the pressure of the bend.


Off to Lowes for a trim run.  I found a piece of molding; believe it or not it is plastic that is 'colored' a 'natural' color.  It matches perfectly to the natural cedar and it bends a whole lot more.  I decided to use Liquid Nails and my brad nailer.  It worked pretty well; again, the trouble spot was the tight radius to the left of the door.  I actually left that section braced and will see what happens after a night of bracing and the Liquid Nails.


The picture before the one above was a bit out of order.  I added a panel of insulation to the shelf.  It's not glued in; again, if I ever needed to get to the wire runs, I can by simply lifting the insulation panel up.  


I used liquid nails to glue the cedar to the foam.  Much happier with the tack of Liquid Nails than the PL 300 adhesive.  


Almost finished.


Done.  Look how nice that trim piece pulls the ceiling and the back wall together.  I am very pleased with the 'plastic' trim piece.

I did try out the baskets before adding the insulation and the cedar, but this was my confirmation.  They fit perfectly and the lip of the shelf (which has a piece of foam glued to it by the way) holds them from moving forward.  There is about an inch of 'wiggle room' in the back.  You would think I made it that way!


You can see that the back of the totes fit exactly to the top of the cedar strips in the back.


Picked up a can of this Leak Seal.  I wanted to use it in the wheel wells.  I decided to go over the wood 'angles' I used to make the wheel well in the galley.  They've been treated and painted with the undercoating, but I found teeny tiny spots that missed the undercoating.  This just gave me an extra coat of comfort.


Here's a better shot of the flange I installed around the vent.  It looks great!


The porch light switch installed, glued and braced for the night.  Again, I really like the way the cedar accent looks.  It ties the design together nicely I think.


Finished up the little nit picky pieces in the bulkhead.  The only thing left to do in that area is to cover the side pieces of foam in headliner and glue the cedar strips to the 'floor' of the cabinet.  I'm thinking this is where we'll keep our shoes at night.


What do you when your teardrop is 5' wide and all the strips of cedar come in 8' lengths?  Well, you use those strips to cover the shelves and you line the built in storage bins to give them a super nice smell!


With some stuff in it!


 The back storage bin.  


I had been thinking about how I could install some simple curtains for some privacy in the teardrop.  Well, I found a solution.  Before the windows were installed, there were two angle irons that gave rigidity to the door.  When I removed them, I had to fill the holes with bolts and nuts.  I had made them very short to just 'dig' in to the foam core that will be glued to them.  Well, if you look closely, there are three nuts above and below the molding of the window.  If I were to simply add a larger bolt (one that would go all the way through the foam/headliner, I could use that bolt to anchor a curtain rod.  Aha!  Solution!  Now, to decide on a nice looking rod and to purchase the right length of bolt!  Then I get to choose a cool fabric that will pull everything together!


One last view of the shelf area.  You can almost smell that lovely cedar!  I'm so glad that I did not put 'cabinets' in this area.  By keeping it a shelf with the bins, I have a lot of flexibility.  Plus, by making this out of cedar, I've ensured a great smell, low chance of 'rot' and it will keep bugs out.  I was initially concerned about not 'treating' the cedar.  I was wondering if the cedar smell would ever be 'too' much.  Not a problem.  It smells great, but it's not too much at all.  I couldn't be happier with how it is turning out.

Father's Day tomorrow.  Would love to get both doors finished.  If I can get them done and installed, and then those last couple of things in the bulkhead, the Carpe Diem will essentially be ready for travel!  Can't wait!

Monday, May 13, 2013

Re-caulking, Gluing, Sealing, Screwing: Mind at Ease!

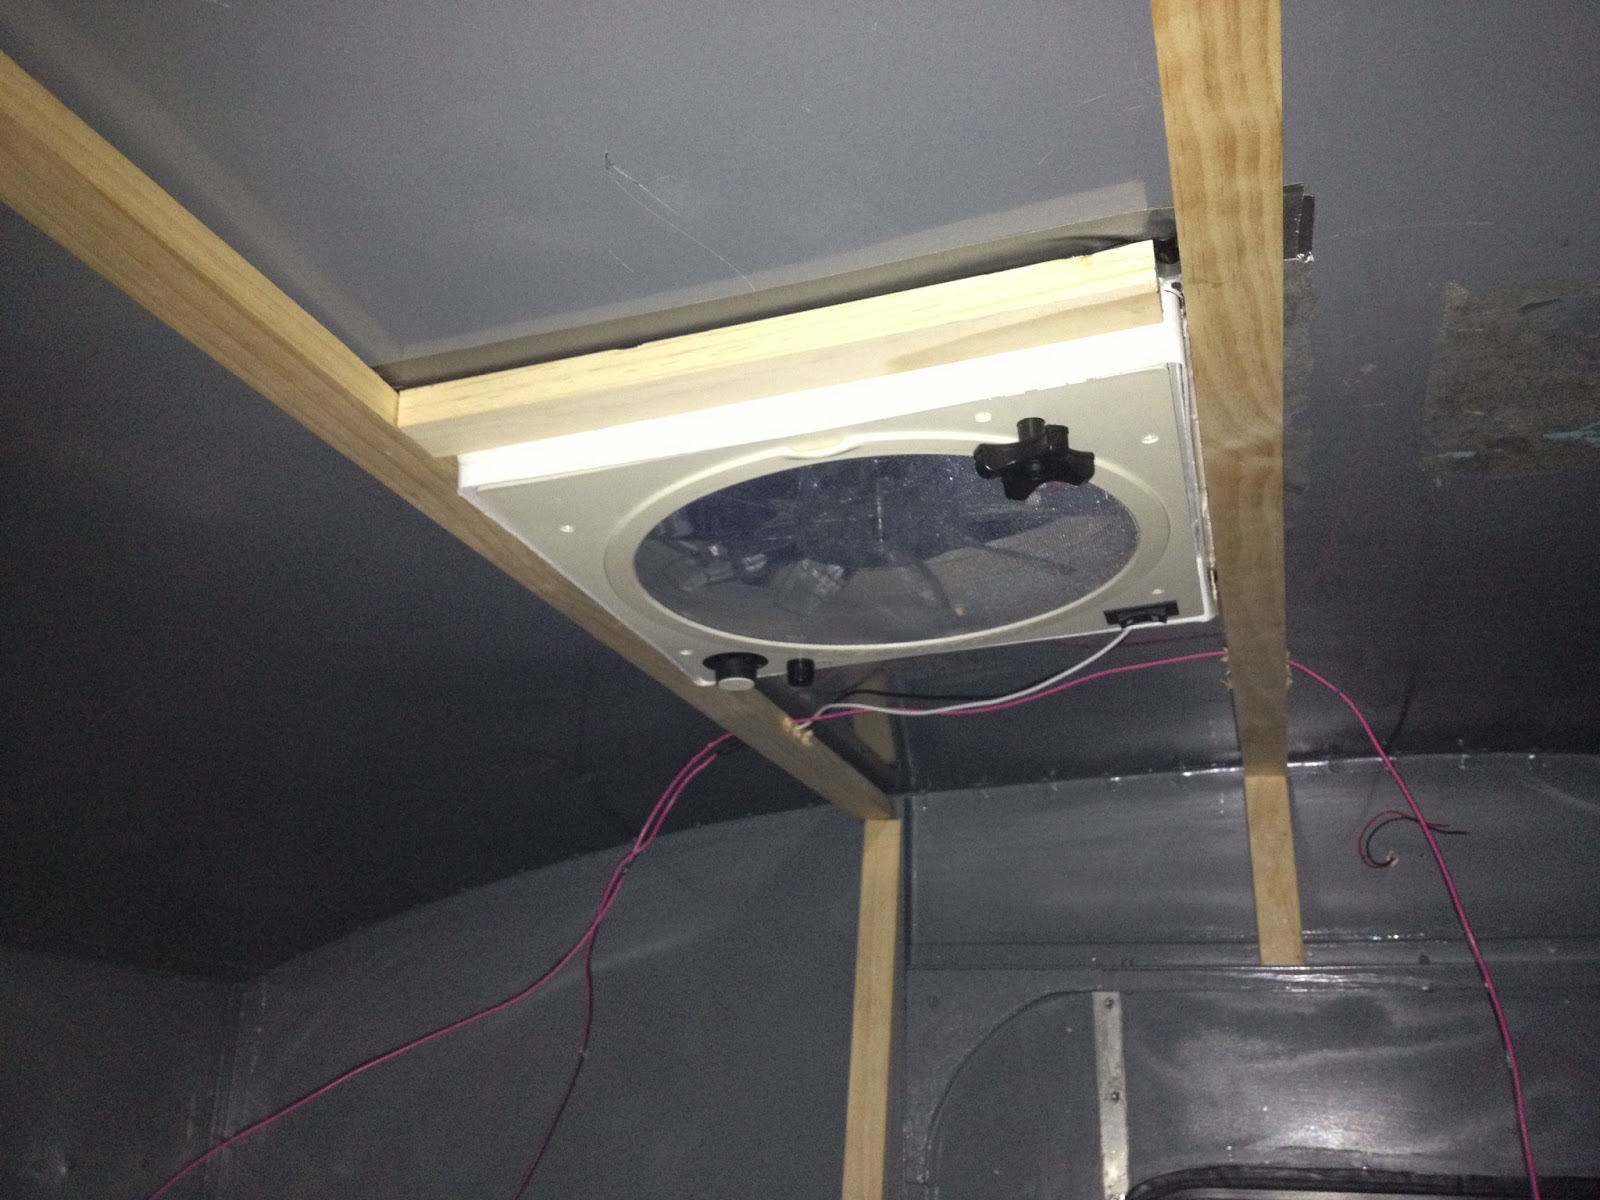
Ended up having an hour this evening to deal with my concerns about leaking. I was able to take off the wood strips I had screwed into the ceiling.  I caulked the area where the fan rests against the roof. Then I added butyl tape between the roof and the wood braces. I was able to remove the screws that had the heads broken off and put in new screws. The whole thing is drying right now. I feel much better about the fan now!


 Butyl tape and caulk applied.  Braces re-installed.


 The Fantastic Fan is now completely sealed!


Storage boxes caulked and sealed.

I also used some backer rod to cover some of my imperfections in the floor storage boxes. The  I re-caulked the gaps in the storage boxes. The last step will be to carpet the bottoms to give a little cushion and stop rattling when on the road.


 I was able to re-glue the dome light in place.  I couldn't get all the paint off the bottom of the foam, so I decided to 'over glue.'  I'm hopeful that it makes a clean seal.  I should add for those of you who are curious, I will be insulating the 'entire' ceiling with the same foam panels.  I only added these small sections because I needed to be able to work with the wires.  Eventually the entire teardrop will be insulated and covered with the headliner.


The last project I was able to finish tonight was to put the weather stripping on the door frame.  The weather stripping was exactly the right size and fit the groove where the door rests against the wood frame.


You can see how it fits snugly against the door frame.


If you look very carefully, you can see that I added a thin gray rubber seal to the door as well.  This is way more protection than the original design.  I'm hopeful that the two parts will fuse to the metal or wood and make a tight and waterproof seal.

Next job:  getting it out of the garage.  At least now I can put it out there and not be concerned about water getting in!  

Just forgot, I still need to seal the bulkhead floor.  I keep forgetting about that because it is hard to see.  I'll try to do that tomorrow evening.  Forgot another: I need to install the rubber membrane over the hinge on the hatch.  Hopefully I can find a really wide bike tube tonight.  One more thing I would like to try to accomplish before putting the drawers and cabinets in place:   I think it would be smart to hang the spare tire from the 'floor' of the galley area where the cooler 'side' will be.  I'll use rubber washers on the bolts to keep water from penetrating through the floor.  That way it is out of the way and fairly easy to access should I blow a tire and need to get it.  Of course, by planning ahead like that, you know that my first flat will be in the middle of a snow or rain storm!

Monday, April 29, 2013

Monday Evening

Was able to get a couple of hours in this evening on the Carpe Diem.  I jacked up the teardrop and was able to bolt the storage boxes to the frame.  Then, was able to install the headliner on the wheel well covers.


I tried to make the 'edges' where they meet look as nice as possible.  I think I'll add some kind of black rubber trim on each of the 'seams' to make it look a bit more finished.  If nothing else, there is a neoprene seal that goes on the bottom of the garage door that I saw and think might work.  The bulkhead is all 'finished' and looks outstanding!


I glued and screwed the right galley side board in place.  I put a dab of silicone on each of the screw holes as I screwed them in.


Was able to finish the tray that the cooler will sit in.  All I need to do now on the galley is decide on the height of the 'counter' and begin blocking it out.  I found a design that I am going to replicate.  Here is an image of it:


It comes from the Tiny Trailer Company.  I like the way they incorporated the Coleman stove into a pull out drawer that doubles as a cook stand.  I also like the two pull out drawers.  Those could be used to hold utensils and cooking tools.  My design will be a little different on the drawers and lower cabinets; but the idea is sound.

Not going to have any time the rest of the week to work on the Carpe Diem.  Will have to plan and do 'virtual work' on the additional systems. etc.

Sunday, April 21, 2013

Sunday

Today was a very productive day!

I started by making a trip to Harbor Freight.  I bought two jack stands for $21.00.  They allowed me, with the help of the jack from my Honda, to lift the teardrop about two feet off the ground. In doing this, it gave me the chance to properly mount the storage boxes.   I ended up using the jack to hold each box in place while I screwed the aluminum angle onto the frame.  I was able to slide in underneath and work easily.  Not a bad way to work by yourself, if I do say so myself!  It's a little hard to see in this image, but the jack is on the axle and there is about a foot of space between the wheel and the floor.  That was a very good purchase.


After mounting the boxes, I cut the aluminum for the storage box lids.  I am so glad I re-did the aluminum because I think it looks TONS better in its shiny finish rather than painted black like I had originally had done.  After cutting the aluminum, I installed the headliner and then glued the aluminum pieces in place.


Doesn't that look awesome?


The next project was to install the aluminum angle that originally held the aluminum to the frame.  The aluminum was pretty badly cut and bent, as you can see from the before images above.  I installed a 1" x 2" green treated board behind the aluminum angle and it pulled the ragged aluminum into place.


That front section looks 'finished' again.  I had originally planned a piece of aluminum diamond plate, or my rubber idea.  It looks so good that at this point, the 'cover up' will still look great, but it won't be hiding anything.  


I took a little time to figure out how the reading light fixture would be mounted inside the teardrop.  The lights swivel and thus have a 'ball' like feature that extends below the plate.  I found that mounting it on a piece of 3/4" plywood was just about the perfect amount of space.  I'll cover this in the headliner material and mount onto the styrofoam to give it a finished look.  This got me excited about how the finishing touches are going to look.  


 My wingman showed up with a present.  He had a cargo basket that he was not going to use anymore.  He made me an incredible deal on it and it fit perfectly on the teardrop's tongue.  I had originally thought I would just buy one from Harbor Freight, but the ones they sell are bolted together and do not have a mesh bottom like this one.  This basket is all welded steel.  The great news about it is that I will be able to easily remove the basket and use it on the tow vehicle's hitch if we ever need or want to use it.  It has a fold up hitch mount that easily slips onto the tongue piece.  I am going to add a couple of bolts and one or two 'U' bolts to hold it on the tongue.  Lastly, I'm going to add a couple of conduit clips through the teardrop to help it ride firmly.  What a great addition to the Carpe Diem!


This image shows how nicely it rides on the tongue and how cleanly the aluminum came together by mounting that strip at the bottom.


 The next project was to replace the aluminum strip that sits on the end of the hatch.  This is the piece that I 're-tooled' to get it as straight as possible.  You can see that I painted it with Rustoleum to protect it.  I installed it with stainless steel screws.


The hatch is off, that's why this image is vertical.


The next project was to try out the new lock sets I ordered.  Unfortunately, it looks like the inner locks are not going to work for my rebuild.  Unfortunately, I would have to drill new holes for the handle in order for the latch to hit at the appropriate spot on the door.  It's right now when I am SO glad that I did not pitch the original door hardware.  A quick coat of Rustoleum and I think the original door latches and locks will work just fine!


The original outside door handles were in bad shape.  One of them was missing, the other had been mangled and was beyond salvaging.  However, I ordered these new beautiful chrome handles.  I will only have to slightly adjust the interior latches in order to get these new handles to work perfectly.

I may end up keeping the original latch for the hatch too.  It's on the lower left section of the image above.


After a thorough cleaning of the garage and putting all my tools and materials back in place, I was able to close down the garage and head back inside ready for the work week.  If I have any time this week, I'll work on the galley cabinets.  All in all, it was a great weekend!