Showing posts with label designs. Show all posts

Tuesday, May 7, 2013

Electrical System Configuration Plans

Now that the cabinets are 'built,' I can start planning the electrical.  I'm only putting in a 12 volt system, but I am going to put in a power port so that if we are in a spot that has power, we can easily trickle charge the battery and have access to a 120 volt outlet.  I'll be going with the simplest power system possible; basically a port which is connected to a power strip.

I have been thinking a lot about where to put the fuse panel/power center and think I've finally come up with a couple of solutions.  I'm not sure which I'll go with, but I'm going to work with both a bit and decide which will work best for me.

There is a magnificent blog by the creator of the Little Swiss Teardrop Trailer.  He has documented his complete build in clear and vivid photographs.

I came across his power center many months ago when I was planning.  One way to do the power center is the idea of the slide out in my build.  Here is an image of his power center:


He has both a 12 volt and 120 volt system.  He needs it; he lives in Texas!  He uses the 120 volt to power his air conditioner.

What I like about the pull out concept is that I could put the battery and control panel in a similar configuration.   Here is an image of the pull out without the electrical power center. 


The one reason I would not use this system is that my cabinet is really tight.  The battery is pretty wide and quite heavy.  I might be able to create a 'tray' to pull out the battery and then have the power center behind the battery.  If I put the pull 'slides' on the bottom of the tray, I buy a little more 'room' in the compartment.

Another solution is to put the 'control panel' on the inside wall to the left of the cooler tray.  There is about 1 1/2 inches between the wall and the cooler.  If I were to cut out the opening for the control panel into the sidewall, there would be plenty of room between the cooler and the box.  Plus, I don't really need to 'see' the switches.  They are there only for if a fuse blows and I'll know it has blown because it won't work.

I'm leaning toward putting the panel in the wall at this point.  This will also leave some additional room in the compartment for the AC power port/strip.  I'll end up putting a DC 12 volt power port next to the panel; possibly a 120 volt outlet too.  Just in case.  This will also make it easier for me to 'charge up' the battery when I have shore power or when I'm at home.  Then I won't have to pull out the battery each time I'm home.

Tuesday, April 9, 2013

Sketches

I don't get much 'work' done on the teardrop during the week, but that doesn't mean my mind isn't working on problems and ideas for it!

I took some time yesterday to try to measure as many parts of the teardrop as possible.  I'm finding Google Sketch Up to be a real challenge; probably should have started with something a bit simpler at this point, but its fun to experiment.

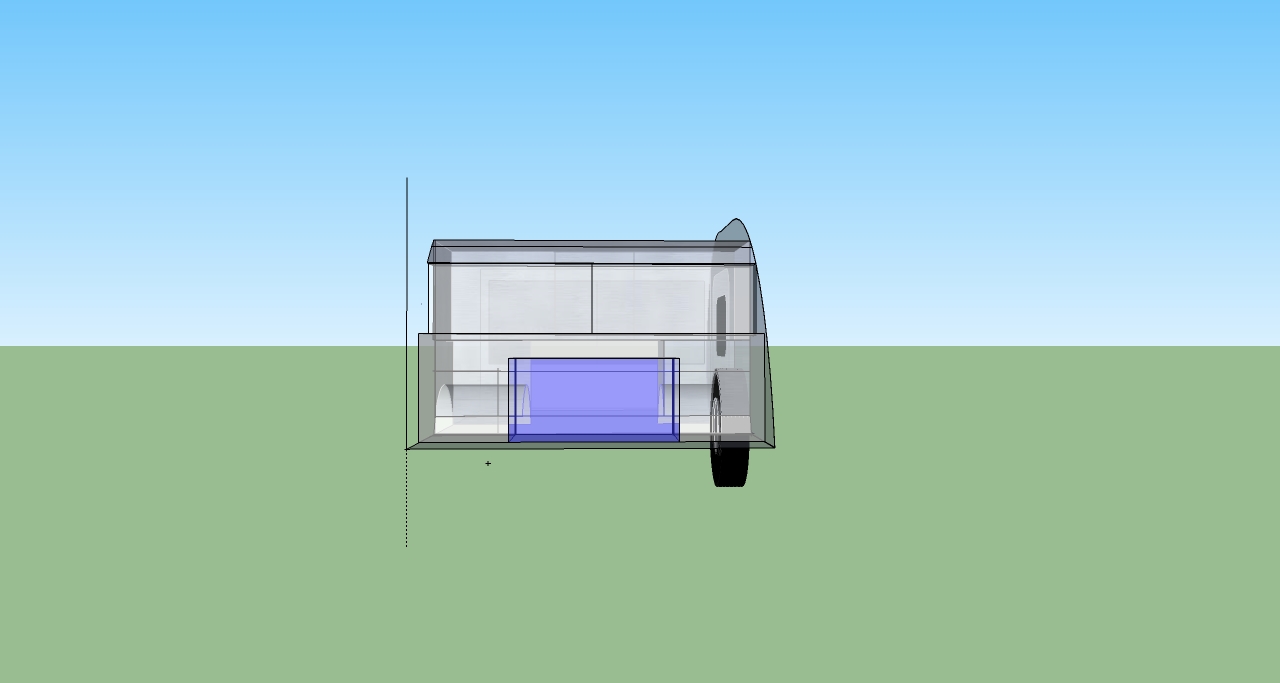
Here are my rough drafts.
This is the side view.  I drew it so that you could see through the side of the trailer.
 Rear view; the blue rectangle is the cooler which will be on a pull out slider.
 You can see the cabinetry of the galley and the rough cabinets inside the cabin.
 Side view:  you can see the wheel wells and interior cabinets.
 You can see all the way through the trailer in this image.
 This gives you a sense of the layout in the galley a bit better.

An above view.

I learned a lot about working with Google Sketch Up.  I think these look pretty darn good!  The key was having very specific measurements from the actual teardrop to put into the drawing program.  I learned that you can make the walls transparent.  This allows you to 'see inside' which is very hard to sketch by hand.  I think I'll go back and tweak the cabinetry in the galley and the cabin a bit more in future versions.

 The back view of the galley.
 Possible layouts.
 Estimates for headliner materials.
 Top view above.  Key measurements on the side of the teardrop.
 Battery compartment and power panel possible layout.
 I had no idea how perfectly symmetrical this design was.  It is truly 60.5" wide and 60.5" high.

Key measurements of the galley area.  It's a lot tighter than a lot of other designs.

Saturday, April 6, 2013

Designs on the Perfect Galley...

I spent some time on the Teardrop and Tiny Travel Trailer page lurking and looking at all the different galley designs.  After clicking my way through over 500 images, I found some ideas for designing my own. 


I like a couple of elements of this design.  I like the center storage of the cooler/stove and the side table.  That cooler is pretty neat! The latches for the drawers are cool; reminds me of things I would find on a boat.  I guess these things kind of are like land yachts.  One wondering would be where is the table top stored when traveling?


I really like the cooler's slide out drawer and the stove 'table' that is built in to the drawer.  A simple water bottle, like the one in this image is perfect for me.  No 'sink' or water pump required.

This looks almost identical to my layout.  The cooler is the same and it will need to be in the center to accommodate the wheel wells.  It looks like the water jug is on rollers too, which would allow it to pull out for use.

 Another nice cooler tray, dressed up with a door.  I'm not sure I could make this work in my galley.


This just looks cool!  The accent of the stainless steel looks terrific; maybe too terrific for camping?


I really like the pull out drawer of this design (especially love the fold down front!  I am appreciating the power center over on the right side there.  This will be sort of how I need to lay out my power center.


I think this is a commercial design, The Little Guy, if I remember correctly.  I like that the cooler has its spot and that the power outlet is there for use.  I could stow my battery and power center in a cabinet like the one at the left.  I do like having some sort of counter.  This is where I wanted to use my beer cap counter top idea; instead of a back splash, it would be on the counter top.


I like how this table is attached to the side of the trailer.  There are some inexpensive brackets that can be purchased that allow you to do this.  Again, where would it be stored when traveling? 


That's enough dreaming for today.  Time for some rest.